Now you are familiar with opening and editing (files in) your project, and you have selected a target configuration, we will have a look at the options you can set for building your project.
First make sure the project myproject is open.
To access the options for your project:
From the Project menu, select Properties for. Alternatively, you can click the
 button.
The Properties for myproject dialog appears.
If not selected, expand C/C++ Build and select Settings to access the TriCore tool settings.
A screen similar to the following should now appear.
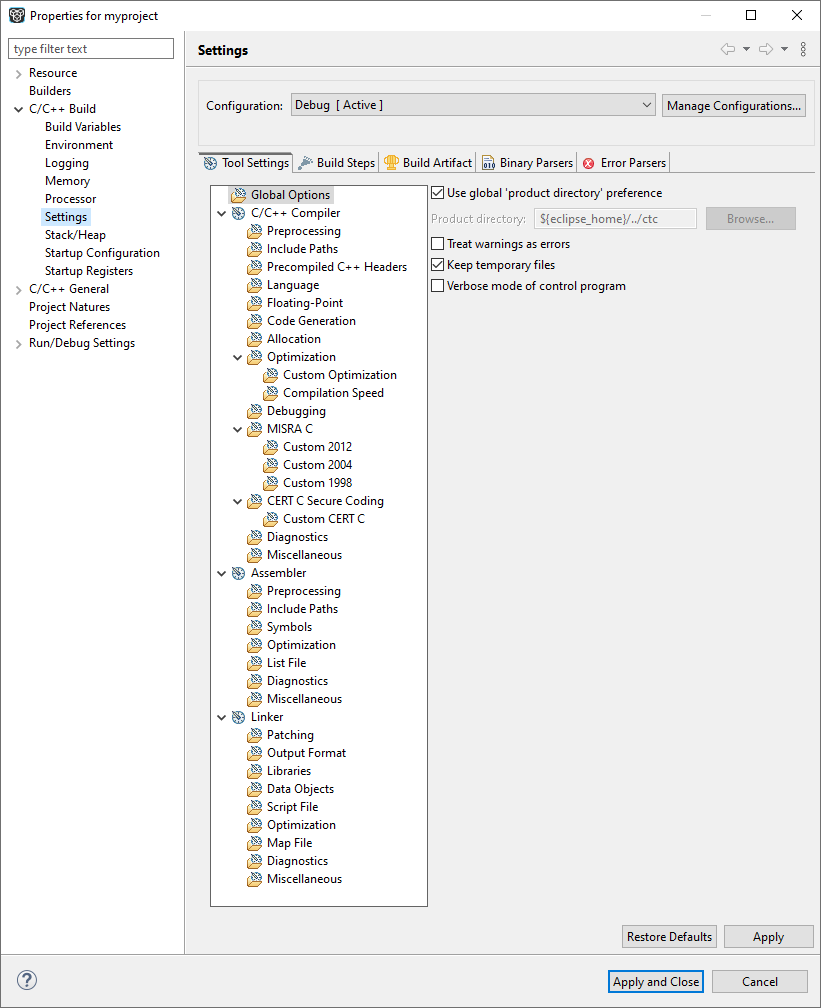
On the Tool Settings tab, the options are grouped in Global Options, C/C++ Compiler, Assembler and Linker or Archiver if you are building a library. Note that the options you enter in the Assembler page are not only used for hand-coded assembly files, but also for the assembly files generated by the compiler. In the Configuration field, you can choose a configuration for which you want to make changes. Note that this does not make the configuration active.
For a detailed description of all TriCore toolset options refer to the TASKING SmartCode - TriCore User Guide.
Selecting a predefined build configuration
A build configuration is a predefined set of options. When you created the sample project myproject as described in Create a Project, you should be able to choose between the Debug and the Release configuration. Both have their own settings. Check this for your self:
Select the Release configuration.
Expand the C/C++ Compiler entry and select Debugging.
The option Generate symbolic debug information is set to None.
Select the Debug configuration.
The option Generate symbolic debug information is set to Default.
Setting options and restoring defaults
You can use one of the available configurations as starting point for setting your options. For now, choose the Debug configuration.
Change the option Default to Full.
At this point you can change as many options as you like.
Click Apply to apply the new setting(s) to your project.
The dialog does not close, but the new options are saved to the Debug configuration.
To restore to the default Debug configuration options:
Click the Restore Defaults button.
The option settings are changed to the default settings of the chosen configuration.
Click Apply to apply the default settings to your project.
If you change options without applying them and you try to change the configuration, you are asked whether to apply the changes first.
Creating your own build configuration
Because of the amount of possible options, it may be very convenient to create your own build configuration.
Click on the Manage Configurations... button next to the Configuration field.
The Manage Configurations dialog appears.
Click on the New... button.
The Create New Configuration dialog appears.
Type a Name (
Myconfig) and optional a Description for your configuration.In the Copy settings from box, you can choose the initial option settings for your configuration:
Select Existing configuration and choose the Debug configuration.
The existing Debug configuration is the same as the default Debug configuration because we applied the default settings in the previous example.
Click OK.
The Manage Configurations dialog shows the new configuration.
Select the new configuration (
Myconfig) and click Set Active.Click OK.
Your new configuration has become the active configuration. From now on, a build will use the option settings from the Myconfig configuration. Note that when you select a configuration from the Configuration field, this only affects the property pages; it does not make the configuration active.
Important: the Restore Defaults button is still associated with the default Debug configuration! Because the new configuration Myconfig is based on the Debug configuration, the defaults of the Debug configuration also apply to the Myconfig configuration.
Creating your own defaults
The previous example showed how to create your own build configuration to store settings. However, it was impossible to return to your own defaults, only the original Debug and/or original Release defaults were available. Below it is described how you can create your own defaults. Basically, you create a configuration A in which you set your own defaults; then you create a new configuration B which will be based on configuration A:
If you have found a satisfying combination of option settings, you can create a configuration named Mydefaults.
First change the option settings to your own needs.
Repeat steps 1 through 7 of Creating your own build configuration but in step 3, type the name
Mydefaults.
Normally, any settings you change from here, are saved to Mydefaults, thus loosing your original defaults. To prevent this:
Repeat steps 1 through 3 of Creating your own build configuration, to create a second new configuration and name it
Myworkoptions. The name suggests that this will be the configuration for experimentally changing option settings.Select Existing configuration and choose the Mydefaults configuration.
Your new 'working' configuration is now the same as the configuration named Mydefaults.
Click OK.
The Manage Configurations dialog shows the new configuration.
Select the new configuration (
Myworkoptions) and click Set Active.Click OK.
Now you can work with the Myworkoptions configuration. If you want to return to your defaults, you can either make the Mydefaults configuration active, or create a new configuration using the Mydefaults configuration to copy the settings from.