Set the TASKING C/C++ perspective
Before creating a TriCore project, it is necessary to have the TASKING C/C++ perspective on the workbench. By default, this should be the case when you start Eclipse, but if it is not, do the following:
Start Eclipse.
Eclipse starts with the last saved workbench layout.
To open the TASKING C/C++ perspective: from the Window menu, select Open Perspective » Other... » TASKING C/C++.
The name of the perspective is displayed in the title bar of the workbench window.
If you attempt to create a TriCore project while the TASKING C/C++ perspective is not active, Eclipse will ask you to activate the TASKING C/C++ perspective after you finish the New C/C++ Project wizard.
Create a TriCore project with the New C/C++ Project wizard
From the File menu, select New » TASKING TriCore C/C++ Project
The New C/C++ Project wizard appears.
Enter a name for your project, for example
myproject.In the Location field you will see the location where the new project will be stored. To change the default location, you can uncheck the Use default location check box and browse for an alternative location. However, use the default location for now.
In the Project type box you can select whether to create an application, a position independent module or a library.
Expand TASKING TriCore Application and select Hello World C Project. This creates the file
myproject.cwith a simple main function.Click Next to continue.
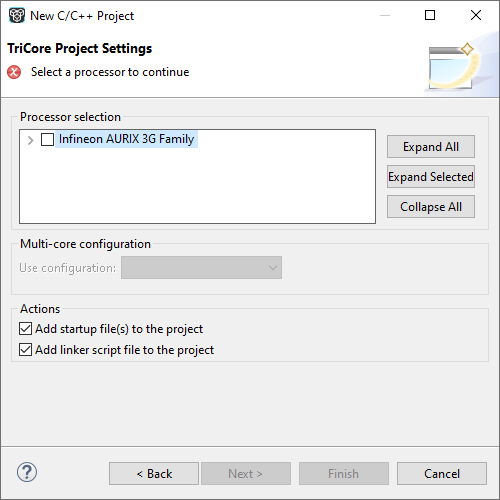
The TriCore Project Settings page appears.

Select the target processor for which you want to build the application. For example TC49x. Afterwards you can always change the processor in the Project » Properties for dialog.
When you selected a multi-core processor, select the multi-core configuration you want to use. If you want to create a multi-core project, select All cores. If you want to create a project for a single core on a multi-core processor, select the specific core.
You can choose to add C startup code to your project and/or add a linker script file to your project.
Enable Add startup file(s) to the project. This adds the files
cstart.candcstart.hto your project (or the_tccorevariants), which are necessary for building C programs. These files are copies oflib/src/cstart*.candinclude/cstart*.h. If you do not add the startup file(s) here, you can always add them later with File » New » Startup Files.Enable Add linker script file to the project. This adds the file
myproject.lslto your project which can be edited to customize linking and locating. If you do not add the linker script file here, you can always add it later with File » New » Linker Script File (LSL).
For details on changing the C startup code and linker script file refer to the TASKING SmartCode - TriCore User Guide.
Click Next. This button is only enabled for 'All cores' and 'Core 0' projects.
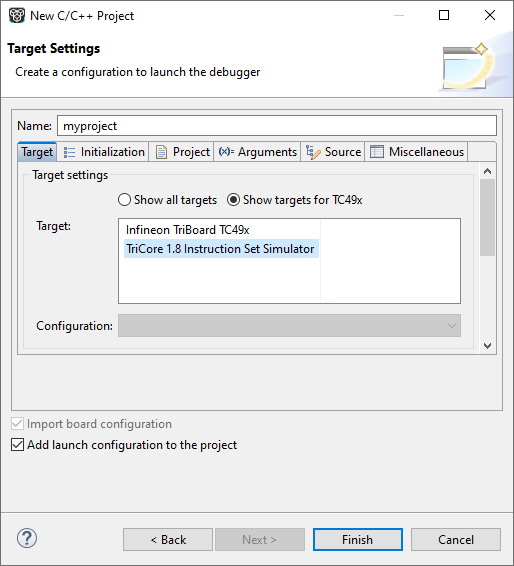
The Target Settings page appears.

Note that you can only specify a target launch configuration for an 'All cores' or 'Core 0' project. If you create a single-core project for one of the other cores, you also need a 'Core 0' project to start the other core project. See Refer to Another Project from a TriCore Project.
In order to debug your project you need to create a debug configuration.
Select a target. You can select a target board or a simulator. For this example we select the TriCore 1.8 Instruction Set Simulator.
(Optional) If you selected a target board, specify the Configuration and Connection settings. For the simulator you can skip this.
(Optional) If you selected a target board, enable Import board configuration. Your project settings, such as memory, flash settings and LSL file (
myproject.lsl) and startup code (cstart.h) will be adjusted to the selected board configuration for you to build your application.Enable Add launch configuration to the project. This allows you to debug your project.
Leave the other tabs as is. For more information, see section Creating a Customized Debug Configuration in Chapter Using the Debugger of the TASKING SmartCode - TriCore User Guide.
Click Finish to finish the wizard and to create the project.
The project has now been created and is the active project. If you click on the Build myproject button (
 ), the project is built and should give no errors or warnings.
The left-hand pane of the Workbench window has two views. The C/C++ Projects view shows the structure of your projects, complete with all files that are used in the project.
In the standard Eclipse documentation about the workbench is described how you can move and organize views on your workbench.